Design and Configuration of an IP-Based Telephony System via Asterisk - Part II

In this post, we’ll build upon our previous setup. Now that the basic configuration is complete, we’ll dive into implementing advanced features such as IVR and Conference.
Interactive Voice Response (IVR)
Whats an IVR
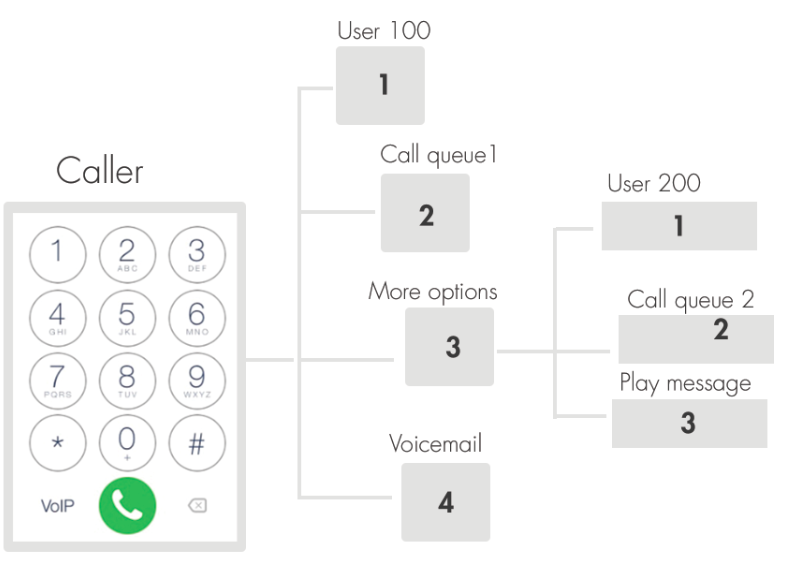
Interactive Voice Response (IVR) is an automated telephony technology that allows callers to interact with a company’s host system via keypad inputs or voice commands. By guiding users through pre-recorded menus, IVR acts as a virtual receptionist, enabling self-service actions like checking account balances, routing calls to specific departments, or handling high-volume inquiries 24/7, ultimately reducing wait times and improving efficiency.
I found this definition on Google, but in simple terms: suppose the company number is 7000. When someone calls this number, they hear a pre-recorded message such as:
Press 1 to contact Administration
Press 2 if you have a problem with our service
Press 3 to leave feedback and so on.
Based on the option selected, the system automatically forwards the call to the corresponding extension. For example, if the caller presses 2, the call is redirected to extension 2000.
Configuration
Now, open the extensions.conf file to start configuring the IVR:
1
sudo nvim /etc/asterisk/extensions.conf
Under the [local] context, add a new extension:
1
exten => 7000,1,Goto(ivr-menu,s,1)
You can choose any unique number; it does not matter.
The Goto() application is used to redirect calls. Its syntax is:
1
exten => extension,priority,Goto(context,extension,priority)
In this case, the call is redirected to another context called [ivr-menu]. The extension s stands for start, meaning the entry point of the context, and the priority is set to 1.
Next, we need to define the [ivr-menu] context to handle user interaction:
1
2
3
4
5
6
7
8
9
10
11
12
13
14
[ivr-menu]
exten => s,1,Answer()
 same => n,Background(ChooseOption)
 same => n,WaitExten(10)

exten => 1,1,Dial(SIP/1000,20)
exten => 2,1,Dial(SIP/2000,20)
exten => 3,1,VoiceMail(3000@default)

exten => i,1,Playback(invalid)
 same => n,Goto(ivr-menu,s,1)

exten => t,1,Playback(vm-goodbye)
 same => n,Hangup()
this section its a sperate section from the [local] Context.
The call is answered using the Answer() application, then the welcome message is played using Background(ChooseOption). The ChooseOption file is a pre-recorded audio message stored in /var/lib/asterisk/sounds/en/, in either GSM or WAV format.
The system waits 10 seconds for user input using WaitExten(10).
When the caller presses:
1 → the call is forwarded to extension 1000 using Dial(SIP/1000,20)
2 → the call is forwarded to extension 2000 using Dial(SIP/2000,20)
3 → the caller is redirected to voicemail 3000 using VoiceMail(3000@default)
If the caller enters an invalid option, the Playback(invalid) application is used, then the call is redirected back to the IVR menu using Goto(ivr-menu,s,1).
If no input is received within the timeout period, Playback(vm-goodbye) is executed and the call is terminated using Hangup()
The Diffirence Between Playback() & Background()
both applications let you to play music/sound files ,but when it comes to IVR we need to interact with keypad while the music/sound file is playing. and this functionality is allowed by the Background() application, the Playback() will block until the music/sound ends.
Record Music/Sound
1
2
3
4
5
exten => 300,1,Answer()
 same => n,Playback(beep)
 same => n,Record(/var/lib/asterisk/sounds/ChooseOption.wav,5,30)
 same => n,Playback(thank-you)
 same => n,Hangup()
To create your own IVR music, prompts, or custom messages, you can use the Record() application. This allows you to record directly from a call and save it as an audio file for later playback.
How it works:
Answer() → answers the call.
Playback(beep) → plays a beep to signal the start of recording.
Record() → records the caller’s voice or custom sound:
File is saved as GSM format at /var/lib/asterisk/sounds/ (in our case).
Stops automatically after 30 seconds or 5 seconds of silence.
g option allows the caller to press # to stop recording early.
Playback(thank-you) → plays a confirmation message.
Hangup() → ends the call.
Usage: You can use this to create custom IVR messages or music prompts that will be played back in your IVR system using Playback(filename) or Background().
Conference Room
A Conference Room allows multiple callers to join a single call and communicate together, like a virtual meeting room. This is usually implemented using the ConfBridge() application.
and we need to configure it under the [local] Context to be handled correctly :
1
2
3
4
5
exten => 9000,1,Answer()
 same => n,Authenticate(1234)
 same => n,Playback(conf-enteringno) ; "Entering conference number"
 same => n,ConfBridge(1,default_bridge,default_user)
 same => n,Hangup()
Explanation:
9000 → extension for the conference room.
Answer() → answers the incoming call. this application is used to make the system handles incoming calls.
Authenticate(1234) → prompts the caller for a PIN (1234) before joining the room.
Playback(conf-enteringno) → plays a message like “Entering conference.”
ConfBridge(1,default_bridge,default_user) → connects the caller to conference room 1, using the default bridge and user profile.
Hangup() → ends the call when the user leaves.
Notes:
Only callers who enter the correct PIN can join the conference.
You can create multiple conference rooms by changing the room number in ConfBridge() (e.g., 2, 3, etc.).
we need to configure confbridge.conf file to define how the conference behaves.
confbridge.conf file:
1
2
3
4
5
6
7
8
9
10
11
12
13
14
15
16
[general]

; === User Profile (The Caller) ===
[default_user]
type=user
music_on_hold_when_empty=yes   ; Play music if they are alone
announce_join_leave=yes        ; Say "User has joined"
announce_user_count=yes        ; Say "There is 1 other participant"
denoise=yes                    ; Reduce background noise

; === Bridge Profile (The Room) ===
[default_bridge]
type=bridge
max_members=50
mixing_interval=10
video_mode=follow_talker      ; If you use video phones
Time Condition GotoIf()
Time conditions allow your IVR system to behave differently depending on the time of day or day of the week. This is useful for businesses that have working hours, so callers get different messages during open hours versus after hours.
For example, you can play a “We are open” message during office hours, or a “Sorry, we are closed” message at night or on weekends.
Example Configuration:
1
2
3
4
5
6
7
exten => 7000,1,GotoIfTime(09:00-17:00,mon-fri,*,*?dayGreeting1001,1:nightGreeting1001,1)

exten => dayGreeting1001,1,Playback(openTimeVoice)
 same => n,Goto(choose-the-language,s,1)

exten => nightGreeting1001,1,Playback(closeTimeVoice)
 same => n,Hangup() ; Fixed typo: was Hungup
Explanation:
7000 → main IVR extension.
GotoIfTime(09:00-17:00,mon-fri,,?dayGreeting1001,1:nightGreeting1001,1) → checks the current time:
If Monday to Friday, 9 AM – 5 PM, jumps to dayGreeting1001.
Otherwise, jumps to nightGreeting1001.
dayGreeting1001 → plays the open time message (openTimeVoice) and then sends the caller to the language selection IVR (choose-the-language).
nightGreeting1001 → plays the closed time message (closeTimeVoice) and then hangs up.
Why we use it:
Provides a professional experience to callers.
Automatically handles business hours and after hours calls.
Reduces the need for manual call handling outside working hours.
Testing the System
For testing, I used the Zoiper softphone on my laptop (instead of a phone) to easily take screenshots.
You can download Zoiper from the official site: Download Zoiper
Step 1: Registering to the VoIP System
To register, you need the following credentials:
Username:
1001Password:
1001passServer IP Address:
192.168.0.103

After installing Zoiper, open the application and select Continue as a Free User:

Next, enter the username and password to register successfully:

Then, provide the server IP address:

Zoiper will optionally ask for Authentication and Outbound Proxy — click Skip.

Step 2: Verify Registration in Asterisk CLI
Open the Asterisk CLI to check registration and call activity:
1
sudo asterisk -rvvv
Since I was already in CLI mode before registering the user, we can see the registration messages as follows:

Step 3: Making Calls and Leaving Messages
Back in Zoiper, you can now:
Make calls
Leave voice messages
Test IVR functions

Step 4: Troubleshooting with Asterisk CLI
The CLI Mode is the primary tool for debugging. Here are the most effective commands for monitoring the system:
1
2
3
pjsip show endpoints     # Verify if users are online
pjsip show channels      # View active calls in progress
core show applications   # Check available dialplan functions
Running pjsip show endpoints provides a quick snapshot of all configured users and their current connectivity status. 
Conclusion
This testing phase confirms that the Asterisk server is correctly processing PJSIP registrations and routing traffic. By validating the connection through both the Zoiper interface and the Asterisk CLI, we ensure the environment is stable. With this functional foundation, the system is now ready for more advanced configurations like call queues, external trunks, and custom dialplan logic.